Monday, September 13, 2010

iRed Lite ID Tricks

A feature of iRed Lite which I have only just started to explore is to the use of multiple Apple Remote IDs to directly access actions on various layers within iRed Lite.

Each Apple Remote can be set to an ID between 0 and 255.  This is explained in a 3-page PDF document on the iRed Lite web site, as is the procedure to change the address.  This is done by holding down the Menu and Play buttons on the Apple Remote for 5 seconds (although I couldn't get this to work with a 2nd generation Apple Remote and instead used the Menu and the central Select button.)

The big advantage of using the Apple Remote IDs is that you can overcome the limitation of 6-buttons inherent in the Apple Remote.  Of course, there is not much point in having several Apple Remotes with different IDs but a programmable remote (such as our Logitech Harmony 525) can learn commands from one Apple Remote with its ID changed to various values, and the resultant IR commands can be assigned to various buttons on the Logitech remote.

Example:

So far, I have added an action triggered by the Up button with ID=246 to the Elgato EyeTV Device on the Logitech remote using the # button (unused by the default Eye TV configuration).  When pressed, the # button activates an Action via ithe EyeTV Extra layer in Red Lite to Zoom Out the Mac screen.

Next Step:

 I want to try to combine the iRed Lite layers for Mouse Control and VLC control to be activated by various buttons on the Logitech remote without having to change layers.

Success!

By combining actions from 3 layers in iRed Lite, each with different Apple Remote ID's, and adding some behind-the-scenes Applescripts, our Harmony remote can now activate various functions including:

  • open Finder window with "menu" of movies available to play with VLC
  • mouse movement and item selection, e.g. double click movie to play
  • VLC fast forward, rewind, play & pause controls
  • VLC fullscreen toggle including auto zoom-out of Mac screen
  • VLC quit when the movie is finished
  • Change between "spaces" on Mac screen (if required)
This is pretty much working the way I had hoped now, and the use of multiple Apple Remote ID's is certainly worthwhile as it avoids the need to manually switch between layers in iRed Lite.  Once set up, there is no need to use the iRed Lite on-screen interface - iRed Lite beavers away in the background and passes commands to the system and/or required applications. 

Eliminating the need to manually switch between iRed Lite layers avoid the need to use the pesky meny key, which can sometimes trigger Front Row or the on-screen menu in EyeTV.

A couple of tips:
  • Avoid assigning actions to the double-click button presses, particularly for the mouse movement buttons, as it is easy to press twice when positioning the mouse and activate an unwanted action.
  • Rather than using double clicks, which are non-intuitive for a remote and have to be remembered, create additional layers with different ID's to create more actions, and assign these to specific keys on the programmable remote.  The Logitech 525 has provision for several "pages" of custom buttons either side of its display, so unusual functions can be added here and labelled appropriately, e.g. Spaces Next, Quite VLC, so the function is fairly obvious.
Logitech Remote for EyeTV

I still have a separate "device" programmed into the Logitech remote for EyeTV, as it has a much broader command set and therefore uses most of the buttons on the Logitech remote.  I have used iRed Lite to add a few extra "Mac-centric"commands, such as changing between spaces, and zooming out the Mac screen.

Apple Remote ID's and Logitech Remote

The following is mainly to refresh my memory of the various IDs applicable to our Apple Remote:

Out of the box: ID=134 - programmed into Logitech as Mac Mini device
First change: ID=245 - programmed into Logitech as AR135xxxx
Second change: ID=246 - programmed into Logitech as AR246xxxx

I don't know why the first ID change resulted in ID=245 - maybe it changed to a random value when the battery was removed for a while?  That is why I labelled these AR135 in the Logitech as I was expecting an ID=135.

xxxx = Menu, Select, Play, Left, Right, Up or Down, e.g. AR246Menu.  This is just my shorthand when learning commands so I don't forget the associated ID and button on the Apple Remote.  It is worthwhile learning the commands for all 7 buttons, even if they may not get used, as it is hard to return an Apple Remote to a specific ID - the only reliable way is to change the ID up to 255 times!

If I run out of learned commands, I will increment the Apple Remote ID again (to 247) and learn them again.

For each ID, I am also learning the commands twice, into both the Eye TV and Mac Mini devices in the Logitech software, as I am not sure which device I will use them for at this stage.  It does not seem possible to cut an paste commands from one device to another in the Logitech software - another wish list item for Logitech.

Monday, September 6, 2010

Mac Mini Wish List

If Apple are serious about the Mac Mini being used as a Home Theatre PC they should consider adding or improving the following features:
  1. improving the DVD Player software so it doesn't crash if the DVD has a slight scratch.
  2. having a global control to increase the font & icon sizes so that applications can be comfortably viewed and controlled on a HD screen from typical TV viewing distances.  A double of font & icon sizes would be about right as a starter.
  3. upgrading the inbuilt IR received to increase the range of IR commands possible.  This would allow use of more sophisticated remotes and get around the 6-button limitation of the Apple Remote.
  4. increase HDD size to 2TB minimum.
  5. fix the problem with excessive noise from the optical drive when at high speed, or provide inbuilt utility to limit speed,
  6. make a Bluetooth Apple keyboard with inbuilt touchpad and scroll wheel emulation for zooming.  The Logitech MediaBoard Pro comes close but doesn't have the Apple Command key.

Sunday, September 5, 2010

More on iRed Lite VLC Setup

Here is some more detail on how we setup iRed Lite to use the Apple Remote with VLC.  

There is a default set of actions for VLC but these are relatively limited as they only cater for the 6 basic buttons on the Apple Remote.  The main functionality that is missing, for viewing movies, is fast forward and rewind capabilities.  The Left and Right buttons on the Apple Remote activate Previous and Next.  Although useful for music, e.g. in a playlist, these are not useful for a movie.  There is no way to move forwards or backwards within the movie via defined Applescript commands: Next restarts the movie from the beginning.  More on that later.

The screenshot below shows the iRed Lite setup for toggling VLC in or out of Fullscreen mode.  Often, when  a movie starts, it is in a small window and the Mac screen may also be zoomed in, especially if using Finder to choose a movie file from a folder.


We used simple Applescript commands to combine the Mac Zoom Out and VLC Fullscreen operations into one iRed Lite action which we assigned to the Up arrow (single click) on the Apple Remote.  The logic was that the Up button would increase the screen size.  This button also toggles the VLC Fullscreen feature off again, to go to back to a smaller window, in which case it doesn't matter if the Mac gets another Zoom Out command.

I should say that we have changed the default operation of the Apple Remote Up and Down buttons to require double-clicking to operate the VLC volume control.  This is because we use the Logitech Harmony 525 remote to emulate the Apple Remote, and the Logitech remote has dedicated Volume Up/Down/Mute buttons which we have programmed to operate the Sony TV directly rather than the VLC or Mac system volume.  Thus, the TV volume control is our primary volume control and the other volume controls stay at a set level.

The reason we left the VLC volume controls accessible, albeit via double clicking, is that it is sometimes necessary to adjust the VLC volume.  We found that if the VLC volume is too high (much over 100%), the sound can be distorted from the TV.  We found it better to keep the VLC volume moderate, and adjust the TV volume up a bit.  This also makes the VLC volume similar to other applications, e.g. EyeTV, so there are no sudden jumps in volume when switching between applications.

The tricky part of setting up VLC with iRed Lite was activating the Fast Forward and Rewind functions. Although these are available in VLC via menus or via hotkeys, they are not available via Applescript.  So, we configured iRed Lite Actions to operate via simulating keystrokes, as per the screen shot below for the new action Skip Fwd.

The default hotkey in VLC for Skip Fwd is Option-Command-Right but we found, for some reason, that this didn't work reliably in iRed Lite (It should have.) as it sometimes triggered the Next function which reverted to the start of the video rather than skipping forward a few seconds.  As a workaround, we redefined the HotKey for SkipFwd in VLC to be a single letter "a".

(The unreliable operation of the Option-Command-Right hotlkey combination arose when we entered this as a "keystroke" type action in iRed Lite.  It may have worked had we entered it as a keystroke command in an Applescript type action, but we didn't know how to enter a multi-key keystroke via Applescript at that stage, and we haven't tried it since.  By all means, give it a try before altering the VLC hotkeys as we have done.)

We wanted the Skip Fwd to skip a reasonable time ahead, so we actually allocated the hotkey "a" to be a "Medium forward jump" in VLC which equated to a 1 minute jump.

We also allocated the hotkey of "b" to "Short backwards jump" (about 10 seconds) and "p" to "Medium backwards jump" (also 1 minute), the latter being activated by a double-click of the Left remote button.  This combination provided good fast-forward and rewind control of VLC from the Apple Remote, and the larger jump in the forward direction made it similar to the behaviour of EyeTV which we also use frequently.

Saturday, September 4, 2010

Use of EyeTV to play MP4 and M4V Video Files

Just noticed that EyeTV has the ability to open video files in MP4 and M4V formats, and you can play these files from the Finder by selecting "Open with" or changing the default application for files of this type (from Show Info window) to EyeTV.

EyeTV doesn't show up as a application in "Open with" but you can browse to it, same with setting default applications for file types.

We are going to trial EyeTV rather than VLC as the default video player application.  If it works well, it would have the advantage of being able to use the same user interface that we use when watching live TV or off-air recordings in EyeTV.

Also, the EyeTV remote (which operated via a separate IR receiver in the EyeTV USB modules) has more functionality than the Apple Remote.  In our case, we have programmed the controls for both remotes into our Logitech Harmony 535 remote and we can simple switch "devices" on the 525 to swap between Apple Remote emulation and EyeTV remote emulation.

We would still have to use VLC when playing a DVD, or when advanced features are required such as playing a video file with separate subtitle file (.srt).

Friday, September 3, 2010

Some Applescripts to work with iRed Lite and the Apple Remote #1

Script to Open Movie Folder and Zoom In

The purpose of this script, is to open a folder of "Movies to be Watched" from an Apple Remote (or emulation thereof) to allow a movie to be played without using the full keyboard.  The runs as an "Action" from iRed Lite software, on the "Mouse Control" layer.  Double-clicking the right key on the remote triggers the script, as the per the screenshot below from iRed Lite.


This script uses the "Universal Access" Zoom feature to zoom in on a Finder window to makes it easier to read the file info from typical TV viewing distance (even with 40" screen).

The position of the zoomed-in portion of the screen is not predictable as it depends on the initial mouse cursor position.  Therefore, a major portion of this script is devoted to positioning the mouse cursor at the exact centre of the screen, prior to zooming in.  This is complicated by the lack native cursor movement commands in Applescript (although they are available with various add-on software).

Various sites/blogs suggest use of another Universal Access feature which allows cursor control via the keys on the numeric keypad.  Some people were not in favour of this approach, fearing they would lose use of the numeric keybad, although it is possible to turn the feature on and off with 5 presses of the Option key - which could also be done as part of a script, if required.  In our case, our Logitech keyboard doesn't have a numeric keypad so there was no penalty in permanently enabling the cursor control feature via system preferences.

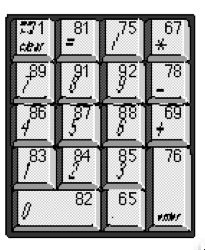
The next issue was to determine the key codes for the keys in the numeric keypad, so they could be used for cursor control.  Although utilities are available to display the key code when you press a key, these would not work for us as there are no physical keys to press.  (We don't have a standard Mac keyboard either.)  Fortunately, I found a site which included a diagram of the keyboard with key codes on it.  An extract from this site is shown below.  The numeric keypad has an advantage in that it provides for diagonal cursor movement (via the 1, 3, 7, and 9 keys) in addition to up/down/left/right (via the 2, 4, 6 and 8 keys).

The strategy to position the cursor in the centre of the screen is to first move it to the top left corner, irrespective of its starting position, to move it to a known location.  Then, it is possible to precisely move the cursor to the centre of the screen.

By combining diagonal and left/right movement, as per the script below, it is possible to create a diagonal movement with the appropriate angle to suit a 16:9 screen ratio.  This is not essential, but it looks nice.

Once the cursor is positioned in the centre of the screen, it is then simple to zoom in and open the required Finder window, and set its bounds to fit nicely in the visible portion of the screen.

To use this script with iRed Lite, we have included it on the Mouse Control layer activated by double clicking the right key on the remote, in place of the original "Right 8' (move right 8 pixels) Action.  (The double click feature for letf/right cursor movement is largely superflous as the single-click left rights keys can be pressed multiple times or held down for larger cursor movements.  The double-click on the left key is also potentially available to activate some other script or action if required.)

In use, once the Finder window appears displaying the list of available movies, the cursor control and OK keys on the remote can be used to open the required movie with the default application (VLC in our case).  Once VLC launches, iRed Lite automatically switches its layer setting to the VLC layer and the remote button functions are remapped to new functions tailored to VLC.  Further mouse control is not possible unless the layer is changed using the Menu button on the remote (standard iRed Lite functionality).

In the Mouse Control layer of iRed Lite, we also changed the basic mouse movement keys from 4 pixel to 8 pixels movements.  The 8 pixel actions are already defined in iRed Lite.  The larger steps, we feel, provide better mouse movement on a large (Full HD) screen.

Here is the script associated with the "Open Movies" action in iRed Lite"

-- Close any existing Finder windows
tell application "Finder"
close every window
end tell
-- Zoom screen out to show full screen.
tell application "System Events"
keystroke "-" using {command down, option down}
end tell
-- Position cursor prior to zooming in screen.
-- This requires use of Numeric Keypad for mouse movement
-- in System Preferences - Universal Access
-- Logitech keyboard has no numeric keypad anyway.
tell application "System Events"
-- First, move cursor diagonally to top left corner.
-- Repeat enough times for any starting position.
-- Move diag. 9 times + left 7 times to match 16:9 screen
-- with minimum key presses.
repeat 120 times
repeat 9 times
key code 89  -- move cursor up & left
end repeat
repeat 7 times
key code 86 -- move cursor left
end repeat
end repeat
--Then, move diagonally to screen centre.
repeat 60 times
repeat 9 times
key code 85 -- move cursor down and right
end repeat
repeat 7 times
key code 88 -- move cursor right
end repeat
end repeat
end tell
-- Now it is time to zoom in towards centre of screen.
-- Zoom ratio set in Universal Access prefs: approx. 1.8
tell application "System Events"
keystroke "+" using {command down, option down}
end tell
-- Lastly, open the Movies folder
tell application "Finder"
open "Expansion Drive:Movies to be watched"
-- tell the front Finder window
-- set text size to 16
-- end tell
--Make finder window centred and half HD width & height
set the bounds of the front Finder window to {480, 270, 1440, 810}
end tell

Thursday, September 2, 2010

Using iRed Lite for Fast Forward/Rewind with VLC

Found a way to use iRed Lite to activate Forward/Reverse jumps in VLC, e.g. for controlling video playback.

Can't use Applescript because VLC only supports a very limited range of Applescript commands, equivalent to the functions of the Apple Remote, i.e. there are no Applescript commands equivalent to the short/medium/long forward/reverse jumps available from the VLC menus.

Solution requires configuring of iRed Lite to use keyboard commands instead, and some minor preferences changes in VLC.

The default VLC keyboard shortcuts for Step Forwards/Backwards are Alt-Command-Left/Right - but these didn't work very well in iRed Lite. It seemed to (sometimes) interpret the remote operation as a Next command which jumps right back to the start when playing a video file.

A workaround was to change VLC Preferences to redefine the required Hotkeys to a simple character. I used "a" for step forward and "b" for step backward. As "a" is already in used, it is first necessary to clear the associated hotkey to free "a" up for reuse. "b" was not used by default, as are quite a few others so it is not essential to free up "a". Once the hotkey changes are saved, it is necessary to restart VLC for them to take effect.

Then, it is a matter of using the editor function in iRed Lite to create new actions using the "a" and "b" hotkeys and assign these to the left and right arrows on the remote. Thereafter, the remote left and right keys will activate a "short forwards jump" and "short backwards jump" in VLC which equates to a 10 seconds jump.

Holding the remote keys down will effectively fast forward/rewind as it sends the jump command repeatedly until released.

(Subsequently found an alternate and probably better way to generate multiple key presses with Applescript, so it may not be necessary to change the VLC preferences at all. Details available if anyone is interested.)

As a further variation, if desired, these or other hotkeys can also be assigned to medium or long jumps. Medium is 1 min - haven't tested long yet. I reassigned the "a" key to a "medium forward jump" and left the "b" as a short jump, so the behaviour is similar to Elgato Eye TV software in that the forward jump is longer to allow "skipping over unwanted content".

Another option, which I haven't tried yet, would be to assign double clicks in iRed Lite to "long" jumps in VLC. This would involve defining additional hotkeys in VLC corresponding to the "long" jumps.

When I later tried to program "long" jumps, I found these had been omitted from the Hotkey list in VLC preferences. So, medium jumps are the best that can be achieved.

I have deliberately avoided going into detail. Further details can be posted on request.

Using the 2010 Mac Mini as a Home Theatre PC

It is about 2 months now since we purchased a 2010 Mac Mini to use as a home theatre PC. This is our first experience with Mac since the late 1980's, so a bit of a learning curve to adapt from the Windows World.

System Hardware:
  • Mac Mini 2010 Model
  • Sony 40" LCD TV (connected via HDMI)
  • Logitech Mediaboard Pro Bluetooth wireless keyboard/trackpad
  • Logitech Harmony 525 Programmable remote control (carry over from previous TV, etc)
  • Apple Remote (only used for programming Logitech remote)
  • Elagato Eye TV Diversity USB dual-HD Tuner
  • Seagate 2TB Expansion Desktop Hard Drive
  • existing ADSL2 Internet access with Airport Extreme Wi-Fi
  • No fancy sound system - the TV speakers are quite good and we aren't into loud action movies.
Software (in addition to standard Mac applications):
  • Elgato  EYE TV - for HD recording, playback, editing & exporting, also plays mp4 and m4v files
  • VLC media player - for DVD's, and exported/ripped video files
  • Handbrake - for ripping DVDs
  • Tuxera NTFS driver - for external hard drive
  • Disk Rotate - limits speed of Mac optical drive to control drive noise
  • iRed Lite* - expands functionality of Apple Remote to control various applications
  • Google Chrome - our favourite web browser - used for online video and general browsing
We built up the system in stages, adding the EYE TV tuner sometime later, which soon necessitated the 2TB expansion drive.

* Please note that iRed Lite is no longer under active development but is still available for download from tin:b Software aka filewell. The current iRed2 product, which is more sophisticated in many ways, also works with the Apple Remote but does currently not have the ability to switch between different "layers" for different applications.

Some issues and solutions/workarounds so far:
  1. Apple DVD Player application freezes or crashes at the slightest scratch on a DVD - using VLC or Quicktime player instead or copy data from DVD prior to playing with VLC or QT.
  2. When using VLC and some other applications, the Mac optical drive spins very fast and is intolerably noisy - recently discovered Disk Rotate utility which limits drive speed to suitable, quiet level.
  3. Wi-Fi network access was a bit unreliable for playing back video from remote Windows PC, and for transferring files to and from remote windows PC - switched to wired network access over existing Cat5 cabling.
  4. Seagate drive was formatted as Windows NTFS - Installed trial and subsequently purchased Tuxera NTFS driver for Mac - works fine. This means that drive can also be used on Windows PC's if needed.
  5. Limited functionality (6 buttons) on Apple Remote, especially when used with VLC - discovered iRed Lite utility and, with some devious programming, even got Fast Forward and Rewind functions working with VLC (rather then Next/Previous). Learnt some elementary AppleScript in the process.
With all of the above, the system is working pretty well now, but I am sure we will find further tweaks from time to time.